

Our Editors independently research, test, and rate what we feel are the best products. We use affiliate links and may receive a small commission on purchases.
In an ideal world, we’d all go backpacking with a small, battery-operated Global Positioning System (GPS) in our pockets and always know exactly where we were. In the real world, however, any electronic device is subject to being dropped, immersed in water or simply giving out.
But hikers need to know how to avoid getting lost in the woods. That’s why it’s vital to bring along an old-fashioned magnetic compass and topological map every time you hike.
Here are detailed instructions on how to use them, along with some tips on how to find your way in a forest without any navigation aids.
For my top gear recommendations for hiking and backpacking, have a look through these popular Outside Pursuits guide links: Hiking Watches, Handheld Hiking GPS Units, Hiking Compasses
Table of Contents
- Tools Needed For Navigation
- How To Get A Topological Map
- How To Use Your Topological Map
- How To Use A Compass
- How To Find Your Way Without A Map Or Compass
- Conclusion
Tools Needed For Navigation
- Topological Map
- Magnetic Compass
- String

How To Get A Topological Map
National Geographic
To get your topological map, check out National Geographic online for free, printable page-sized topo maps of the area you’re going to explore. These will print on regular computer paper, and each one covers 7.5 minutes of longitude and latitude. You should laminate your sheets to help them hold up under outdoor conditions.
The printable National Geographic topo maps will give you an overview on the first page. Four more pages divide the area into quadrants. Here’s an easy guide for following the directions on the site. National Geographic also gives you the option to purchase pre-made 3-D maps that are printed on tough, water-resistant paper.
U.S. Geological Service
Another site for finding topological maps is the U.S. Geological Service site. They have a six-minute video that gives complete instructions on using the service. These maps are also modeled on the 7.5-minute map, and you’ll need the free Adobe Acrobat Reader to access them after download.
The maps are updated every three years and can also be printed for free or ordered for a reasonable price. One nice feature here is that you can choose which topographical features are most important to you. Here are a few of them:
- Structures
- Transportation
- Boundaries
- Geographic Names
- Land Cover
- Elevation
How To Use Your Topological Map
Contour Lines
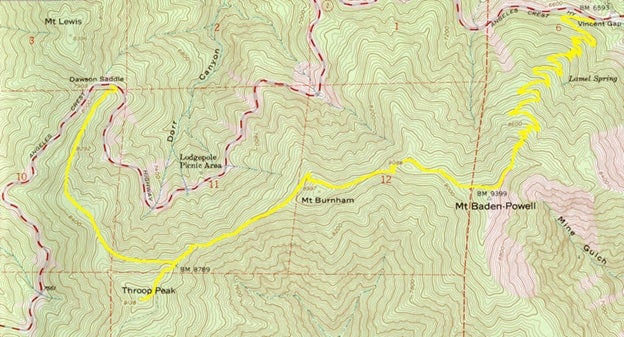
The first thing to know about contour lines is that each line represents the same elevation along its length. If you see lots of contour lines packed together, it means that the elevation is changing quickly and becoming steep. Small circles inside each other generally indicate a tall peak in the terrain.
Every fifth contour line is an index line that tells you the elevation along that line. The elevation change is always consistent between the index lines. Usually, there’s either a 40-foot or 80-foot elevation between them, and this is called the contour interval. Lines that are close together indicate a steep grade and lines that are further apart indicate flatter terrain.
Map Scale
Scale is the relative distance of the map. For example, if a map scale is 1:12000, each inch equals 1,000 feet. The smaller the scale, the smaller the area covered by the map and the greater the detail. Also, the darker the shading is on the map, the denser the vegetation is for that terrain.
Map Legend
The scale and all the lines, colors and symbols of the topo map are defined in the legend. You’ll also find the magnetic declination for the region in the legend. This is a measurement you’ll need to set up your compass.
The legend also defines other symbols on the map that may show up, like ranger stations, shelters, waterfalls and other points of interest. Bodies of water like streams and lakes are represented in blue.
How To Use A Compass
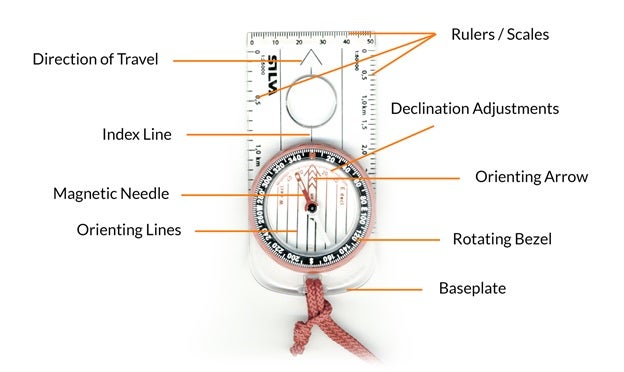 A clear base plate surrounds the compass, allowing you to place it on a map and see beneath it. The base plate has rulers on the edges with different scales that help to calculate the distances on the map. There’s an arrow on the base plate for the user to point in the direction of travel.
A rotating bezel surrounds the compass, and it’s marked with degrees from zero to 360. Inside this ring is another one that indicates the directions north, south, east and west.
A small index line marker directly above these rings, in the direction of travel, indicates where to read your bearings. There are vertical and horizontal orienting lines in the middle of the rings to help align the compass with a map.
The orienting arrow marking is a guide for placing the magnetic needle. Together with the index marker, this helps you orient using the bezel of the compass. When taking your measurements, make sure that you’re not near any large metal objects or any kind of electrical field. Reading the compass near them can throw the magnetic field off.
Declination
Declination is the difference in the angle between ‘true north’ and ‘magnetic north’. The magnetized needle of the compass always points to the magnetic north pole, which can be a few degrees different that the direction you’re going, which is true north. To adjust your compass for declination, you’ll have to add up to twenty degrees to either the west or east to get an accurate reading.
The map legend comes in handy here, as it lists the declination of the area. True north is the basis for latitude and longitude and it’s the measure you’ll need for navigating. If the map hasn’t been revised for several years, you should look up the declination online because it varies over time.
Some compasses have an adjustment mechanism that allows you to set the declination by moving the orienting arrow. To set your compass to true north, you’ll move the orienting arrow on your compass the number of degrees east or west that’s called for by the declination reading.
Once you’ve fixed the declination on your compass, it will point to ‘true north’ instead of ‘magnetic north’ and will be ready to use.
If your compass doesn’t have a way to adjust the orienting arrow, you’ll have to “do the math” and subtract or add to the bearings you calculate. A declination difference to the west will add that number of degrees to your bearing and a declination difference to the east will subtract that number of degrees from your bearing.
Taking a Bearing from a Map
A bearing will tell you the direction to follow to reach a certain point. It will give you the exact number of degrees to orient toward using your compass. If you know where you are on a map, you can take a bearing. Place your compass on the map with the straight edge of the base plate touching your current location and the location you’re headed toward.
Make sure the direction of travel arrow is pointed toward your destination. Now, rotate the bezel until the orienting lines are in sync with North and South on the map. The index line will now show you the bearing direction to follow. For example, if it shows 132 degrees, then that’s the direction to follow to reach your destination.
To follow the bearing, hold your compass out in front of you with the direction of travel arrow pointing away. Rotate your body until the north magnetized needle is inside its red orienting arrow guidelines. With the arrow inside its guidelines, you’re facing the right destination for travel. Some people remember this by calling it “red in the shed” when the magnetic needle is inside the arrow guide.
How to Take a Bearing in the Field
To find your location when you’re outside, you can take a bearing off a nearby landmark. Hold your compass up with the direction of travel arrow pointing away from your body and directly at the landmark. Keep the compass flat while you rotate the bezel until the magnetized needle is within its red orienting arrow guidelines.
The number indicated by the index mark is your bearing. Head toward the landmark with the compass in the same position, rotating your body as needed to keep the magnetic needle within the red arrow guide mark.
To return to the starting place, point the direction of travel arrow toward you. Once again, walk forward while keeping the magnetized arrow within the guidelines.

How To Find Your Way Without A Map Or Compass
What do you do when you’re lost in the woods without a map or compass? The very first rule when you’re lost in the woods is: don’t panic. If you panic, you won’t be able to think clearly and then you’ll really be in a bind! The next step is to find out which direction is north. There are several ways to get your bearings using nature’s signs:
1. Measuring Your Pace
Measuring your pace helps you to know how much distance you’ve covered. Before taking a trip to the woods, practice at home to find your pace. Mark off 200 feet and measure how many paces, or steps, it takes you to reach the end.
When you’re in the woods, put a knot in a long piece of string whenever you reach 200 feet to keep track of how far you’ve traveled. Keep in mind that you’ll take less steps going downhill and more going uphill.
2. Retrace Your Steps
If you get lost, decide whether it will be possible to retrace your steps. This will be easier if you’ve been paying close attention to natural landmarks as you hike.
3. Tie A Piece Of String
When retracing your steps isn’t feasible, you’ll have to find your way using some of the signs listed below. As you make your way out of the woods, tie a piece of string on prominent branches or other landmarks every time you make a knot in the pacing string. This will let you know if you’re going in circles, and it may help those who are looking for you pinpoint your location.
4. Check Out The Trees
Moss generally grows on the north side of trees and large rock outcroppings because they don’t get as much sun there. This isn’t a hard and fast rule, but it can be used in conjunction with other signs to find your way. Conversely, you’ll usually see spider webs on the south side of trees.
5. Look At The Sky
Clouds most often move west to east, although this isn’t a hard and fast rule, either. A more dependable method of gauging the direction is paying attention to the direction of the sun’s path. It always rises in the east and sets in the west.
6. Build A Primitive Sundial
You can make a primitive sundial by putting a stick in the ground vertically. Place a large pebble at the end of the stick’s shadow. Repeat this after fifteen minutes. The line made by the pebbles should be roughly in an east-west direction.
7. Look At The Stars
At night, you can find the North Star to determine your direction. It’s relatively easy to find the Big Dipper in the night sky. It’s shaped like a saucepan with a long handle. From the right outer edge of the saucepan, look to the right five times the length of the saucepan to find the North Star.
To check that you have the right star, look to its right and find the constellation Cassiopeia. This constellation is shaped like a bowl on its side.
8. Walk Downhill
If nothing else works, walk in a downhill direction until you find a stream or river. Continue to follow the water downhill. Eventually, this should lead to a bridge, roadway or buildings. This option is best when you’re in a smaller natural area since it could be days before you find civilization in a vast wilderness.

Conclusion
Once you’ve learned how to read a topological map and compass, you’ll know how to find your way in a forest. These two navigation tools are invaluable, and you should never be without them when exploring in the woods. In the future, we hope you have many happy outdoor adventures!
Author Bio:
Paul Turner is the owner of Take Outdoors, a website for the outdoor enthusiasts. If you are new to camping, he’s written a comprehensive guide to Camping for Beginners that may interest you.
I hope this guide was helpful for learning how to navigate in the woods. If you want to comment or recommend a method I didn’t include, please use my contact form to get in touch.
Have fun and be safe out there!