
Our Editors independently research, test, and rate what we feel are the best products. We use affiliate links and may receive a small commission on purchases.
If it hadn’t been for my boyfriend who has skied for 30 plus years, I probably would’ve never braved the slopes. Because of his encouragement and my being a fairly adventurous person, I was game for trying something new.
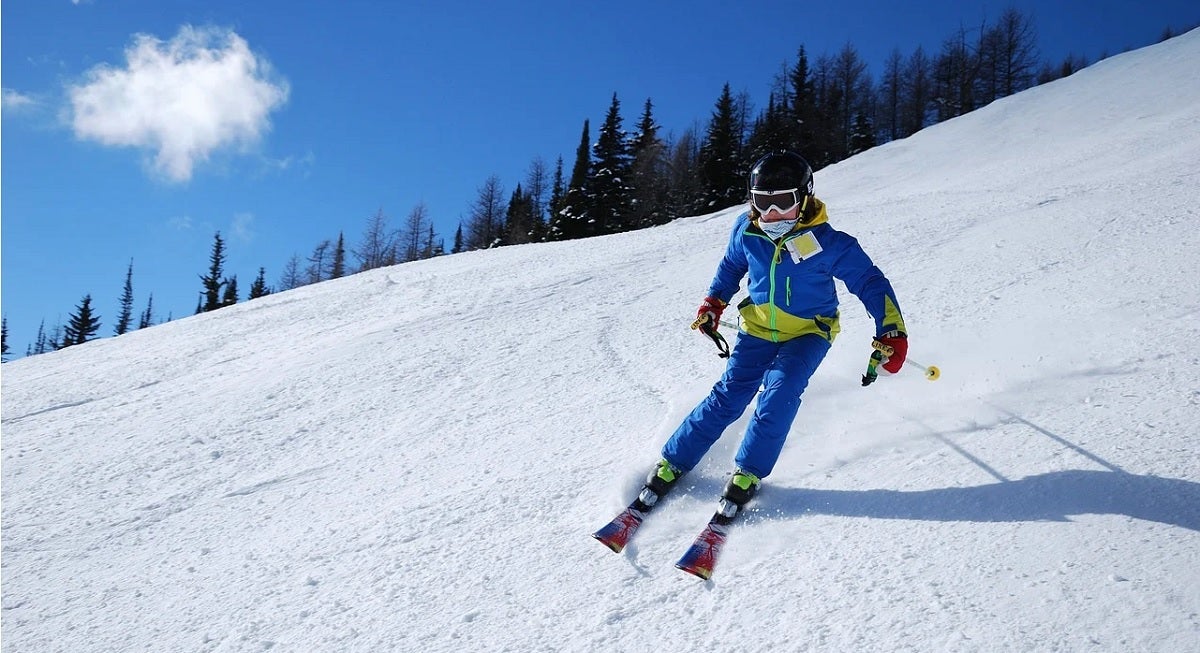
We chose to ski in Telluride, a charming, historic town nestled in a valley and surrounded by the San Juan Mountains which are located in the Colorado Rockies. To describe the town as picturesque would be a huge understatement.
So let’s discuss some of the basics on skiing:
First Off: Is Skiing Hard To Learn?
The great news is, skiing is notoriously easy to start with – however, more challenging to master. That means that the majority of adults who are complete newbies can start to ski on their own on bunny hills and even intermediate slopes after just a couple lessons! What will you learn in these lessons? Let’s take a look at a general guideline:
- Day 1: Here, your instructor will teach you all about your equipment, the mountain, surroundings, etc. You’ll learn how to properly stand and navigate on flat land. You may also start to learn slow, wedged turns on very small inclines.
- Day 2: You’ll begin to slowly link left and right wedged turns on slightly steeper inclines (though still very basic). Depending on your progress, you may even be able to hop on the ski lift!
- Day 3: You’ll continue linking left and right snowplow turns on more challenging terrain.
Throughout the next couple of days you’ll simply practice these skills until you’re more confident and can take on slightly more difficult runs. If you’re catching on quickly, you may even begin to learn parallel turns!
If you don’t have an instructor, that’s perfectly okay! In fact, you may fare better going up with a friend or a family member who’s willing to show you proper technique and skills.
Mind Over Matter
If you’ve never gone skiing before, it can be a scary thing! After all, you’re quite literally soaring down a snowy mountain with two planks attached to your feet! However, if you think about it, we also regularly drive 2-ton motor vehicles at high speeds, too! While learning how to drive may be scary at first, we quickly gain confidence and get used to it. This is how it will be with skiing, as well.
Just remember that your mind is incredibly powerful. You’re going to be just fine, and having someone who you trust there with you will ease your worries. Everyone was exactly where you are at some point in time. The best way to conquer fear is to not even think – just do!
A huge aid here is to stay properly clothed and warm. Layers are your best friend and will help to keep you warm while preventing you from sweating. Make sure you have a high-quality ski jacket or hardshell jacket to wear, too, that is properly waterproofed. Remember: “There’s no such thing as bad weather, only bad clothing!”
How to Make Skiing Easier
This is the part you’re waiting for! How exactly can you make skiing easier? Well, we have to say that there’s nothing that can replace real-world experience out on your skis. The more time you invest in practicing, the better you’ll become; it’s simple. Here are a few tips that will help you out:
- Choose the right ski resort: This is a big one that can make or break your initial skiing experiences and one that many people often overlook. When you’re learning, it’s important that you are in an area with easy to access beginner hills or dedicated beginner zones. These spaces should provide free or reduced-rate lift passes or pulls (though these can also be tough to get the hang of).
- Prepare yourself physically: If you didn’t already, you now know that skiing is physically exhausting and demanding. To make it easier on yourself and to ensure you don’t tap out after a few runs, try hitting the gym or training at home at least a few weeks beforehand. We recommend a combination of cardio and strength training. 30 minutes of cycling or elliptical a few times a week will help with endurance. Strength training that includes explosive movements like jumps and leaps, along with lifting weights will also help reduce that thigh burn!
- Make sure your boots are properly fitted: This is crucial to having a positive experience. Ski boots aren’t something to take lightly and involve much more than just buying a pair of shoes. You’ll need to consider how much you value comfort and performance, and if you’re just starting out we recommend placing preference over the former.
- Don’t give up: As adults we often are more embarrassed learning new things and not immediately being great at them. You’re absolutely going to see kids skiing past you at lightning speeds while you’re sitting on the snow after crashing. It’s not about anyone else, though. It’s all about you and having fun! If anything else, it’s a time to really take in this unique experience and the beautiful nature all around you.
Getting Started Learning To Ski
On Your Own
Even 10 years ago, it would be significantly more challenging learning how to ski on your own. However, thanks to various generous expert skiers and the YouTube platform, you can now do so from the comfort of your own home. Of course, nothing replaces actual practice out on the slopes so you’ll have to make sure to physically practice what you’ve learned.
However, the downside here is that these videos don’t talk back to you. The instructor in your video isn’t going to be able to watch you and provide you with valuable feedback which is crucial to learning proper form to minimize injury and also help excel at a more rapid rate.
Easily put, it’s not impossible at all to learn how to ski on your own. People have definitely pulled off greater feats. However, you should plan on this route taking you much longer and maybe even cost you more injuries or pain.
Learning with Friends
Chances are, you’re probably not going to head up to a ski resort your first time yourself. If you do, then you’re probably an incredibly brave and independent person. As the majority of people feel more comfortable going up with a group of friends or family members, there’s a good chance that someone in said group already knows how to ski.
If they offer to show you the basics, then you’re in a great position as you won’t have to pay for lessons but will still know what you should be doing – more or less. This is the way many people before us have learned. After all, the first skiers obviously weren’t able to go to a ski resort and simply sign up for lessons!
The benefit of learning from friends is that you’ll be able to communicate effectively where there’s a less likely chance of you misunderstanding or getting frustrated. Not only that, but they may show you tips and tricks that a ski instructor would not have in their lesson plan.
Taking Formal Ski Lessons
We absolutely recommend that you take formal ski lessons. The ski instructors out there have received years of training and have years of experience on top of that. This makes them the ideal teachers for someone who has zero or very little experience. They’re not only skilled themselves, but also know how to effectively teach these skills to others.
Just keep in mind that all ski instructors vary a bit, especially in personality. We do suggest that you attend lessons with a reputable ski school as they’ve gained their reputation from greatly skilled employees.
Your instructor will teach you the basics, let you get familiar with your ski equipment, how to stop, turn, get on and off ski lifts, and more. Their number one priority is keeping you safe – as yours should be as well. They will also show you the way to respect the slopes and your fellow skiers, keeping proper etiquette.
How Many Ski Lessons Should You Take?
That’s not really a black-and-white answer, as this depends on your individual goals and budget. For many, they take as many lessons as they can feasibly afford. Others take ski lessons until they feel they don’t really need them anymore or would like to branch out onto their own and develop their individual style.
However, we do recommend getting at least 5 or so lessons to really benefit from them. These are skills you’ll likely never forget too, so if you go the 5 lessons and then leave off until the next season. Oftentimes you can go with a group of 3 or more friends who also want to learn and get discounted lessons. This can make lessons more fun and effective as you’ll encourage each other to continue practicing.
Learning to Parallel Ski
1. Start out on simpler slopes
This is pretty logical anyway. As is the case with just about any ski technique, you’ll want to start out on smaller gradients until you’ve mastered it (or at least feel comfortable enough to move on to steeper slopes). If you’ve already got wedge turns down, then you can progress into parallel turns.
Go back to the days when you were practicing the pizza and wedge positions. That is a great way to transfer into a parallel position. Simply place your attention on finishing the turn. Once you move the wedge into the fall line, let the skis move into a parallel position around the finish.
All you have to do is keep them parallel across the slope. If you are going too fast for your own comfort, simply slide into a wedge. As you start to become more comfortable with traveling at higher speeds, this is a good method to practice.
2. Focus on your boots
When you’re a newbie to skiing, it can be overwhelming trying to be aware of and control every part of your body. The good news is, that’s kind of unnecessary! All you have to do to learn how to parallel ski is focus on what’s inside your boots. Your shins, toes – everything inside your ski boots – is going to affect everything else.
Although it may feel natural or even more safe to bend at the knees, you must focus on flexing your ankles instead. While you can bend your knees, most people have the tendency to place your weight on the heels instead of the balls of the feet. This can make it easier to crash and harder to control your skis.
3. Keep your shins on your boots
The sides of your shins should be quite comfy in your boots. The amount of pressure on your shins will depend on how much control you want, as it is essentially leading the way. The more pressure you have against the boot, the more control you have. You can expect your shins to hurt a bit when you’re first starting out, but not to worry – this will go away soon enough and you’ll become immune to it. If you continue to have shin pain, go with ski socks that have shin padding.
4. Tighten up the wedge
If you want to start parallel skiing, learn of to tighten up the wedge. When you’re going into a turn, try to make a smaller V. While it does seem counterintuitive and may invoke a bit of fear, there’s no need to worry! When you’re going into a snow plow, simply place more weight on one foot. This foot will lead the turn while the other simply slides along next to it.
It’s the exact same method with a parallel turn.
5. Figure out the role of your skis
So, now that you know to place more weight on one ski than the other, which is working and which is passive? You’ll start out by pushing your shin against your boot of the working ski. During the parallel turn, the passive ski slides parallel to the other the entire turn.
We understand it can be a bit daunting learning parallel skiing, as it does mean you’ll be spending more time going straight down the slope. As you’re finishing your turn, simply switch to the other ski. Your passive ski is now the working one.
6. Take out the fall line
When you’re turning into the fall line and head down the slope, you’re going to go even faster. To avoid speeding out of control right down the mountain, you must pay attention to your turn shape. Try to avoid sharp “Z” turns and opt for smooth “S” turns instead. To do this, try to gently push your shin into the boot instead of making sudden moves.
7. Link your turns
This consists of switching over the roles of your skis at the end of your turn, as we mentioned a few steps up. As you’re finishing up, the lower ski is working while the upper is passive. To link, you simply switch these while focusing inside your boots as we explained previously.
8. Practice
If you want to get better, there’s no substitute from getting up the mountain and driving downhill and practicing. However, there are other ways to help yourself. You can get on a flat area, standing with your feet hip width apart. Start to move your shins against your boots just a bit on the left, then on the right.
You’ll feel your skis start to push into the snow instead of them sliding around. Here, you can notice one of your big toes and one of your pinky toes pushing into the boots. Once you’ve mastered this, you can move on to a slight gradient, placing importance on the big toe pushing into your boot on the working ski and the passive with the pinky toe.
9. Switch at the same time
We’ve now covered switching off roles quite a few times now, but it’s crucial to remember that this must be done simultaneously. This is a controlled movement that may take a few times to get comfortable with.
Is Skiing Dangerous for Beginners?
Simply Put
We all know skiing is an extreme sport and with that, there is a certain level of danger which is associated. However, it’s no more risky than if you were to go cycling or participate in a football game. Depending on the type of skiing you participate in, it may even be safer than those sports!
There are a ton of steps you can take to further ensure your safety and better prepare yourself to minimize any risks. Let’s go through some of the most helpful in this guide.
Exercise Beforehand
If you’re not already used to physical exercise, then you’re going to make it much more difficult on yourself. Skiing is a physically demanding sport, so you need to be prepared for it. Not only that, but you want your body to be limber and strong enough so you avoid potential injury and muscle strains!
Since “exercise” is a pretty broad term, let’s go through a few different forms of exercise we recommend:
- Cardio – Cardio comes in the form of running (outdoors or on a treadmill), elliptical machines, bikes, steppers, rowing machines, swimming, and more. However, running has been proven to burn the most calories and get the heart rate up quickly which will mean it can help get you into shape faster as well. Cardio not only strengthens the body but helps boost stamina so you won’t be huffing and puffing a few minutes into a run or trail!
- Walking Lunges with Rotation – Lunges on their own are amazing, but the rotation will help keep you limber and strengthen your core muscles. This rotation is similar to the movements that occur while skiing. You’ll find that even after just a couple weeks of these, your balance will improve and your lower body and core will grow more powerful.
- Lateral ski jumps – It doesn’t take a genius to figure out where this exercise got its name. These jumps are explosive movements which will work your fast-twitch muscle fibers and improve your strength in your lower body and core in quite a bit in a short amount of time. Not only that, but they can help get your heart rate up, boosting endurance.
- Jump Squats – These are a slightly similar exercise to the lateral ski jumps, also an explosive exercise. These strengthen the lower body and core, but also aid in mobility and stamina. Your legs will surely be burning just after a few sets of these!
- Russian Twists – These twisting motions are essential for skiers and will help you flow more naturally when you’re learning. Russian twists are great core strengtheners, working the entirety of your abdominals, placing a special focus on hip flexors and obliques which are often forgotten about.
Lessons
If you can, go ahead and get yourself a few lessons. Sure, you may have a friend or family member offer to teach you, but unless they’re trained at it, you’ll likely be better off with a professional instructor. You’ll find them at just about any ski resort you go to, though if you can, try to book in advance.
If you’re going up with some other beginners, then you can often score a better price by booking lessons as a group. Not to mention, it’s much more fun and helpful to learn with others that you know and trust. These lessons will teach you all about your skis, bindings, and boots. On top of that, they’ll show you how to use the rope tow and/or the ski lift, ski etiquette, and actual ski basics like how to turn and stop.
Even if you don’t have the budget to get multiple lessons, just a single introductory class can set you off on the right foot so you can learn quicker and spend less time crashing or feeling confused.
Safety Equipment
Maybe you feel like safety equipment is lame, but trust us, it’s much cooler not having a brain injury from something that could’ve easily been avoided. There are all kinds of potential obstacles on a mountain, like trees, logs, other skiers, and more. There’s a chance you’ll eventually run into one of them, slip on ice, etc. and wearing a helmet will help keep your noggin in good shape even if that happens.
Helmets come in all types of styles and colors, so there’s sure to be something which suits your preferences. Moreover, helmets are nicely lined with soft material that wicks away sweat so you’ll feel warm and dry the whole day.
Goggles are another necessity that every skier should have. You can get a nice, quality pair of goggles from a reputable brand for no more than 20 to 30 bucks so budget shouldn’t be an excuse. Goggles will keep your line of vision clear, free of fog, snow, and wind. Not to mention they’re much more comfortable and durable than a pair of sunglasses.
With skiing and snowboarding, knee injuries are relatively common. It’s the nature of snow sports, where things can get slippery quickly. To help avoid this from happening and keeping your knees in shape despite regular ski trips, we recommend you grab yourself a knee brace or two. They’ll offer support and stability though won’t inhibit your natural movements.
Stay Warm
It doesn’t matter how good of a skier you are or how cool your gear is – if you aren’t keeping your body temperature properly regulated you’re putting yourself at a serious risk of injury or even death. When we go to ski resorts, we are entering extreme temperatures and possibly weather conditions.
When you’re flying down a mountain at high speeds, snow, wind, and ice is going to be whipping back at you. You need the right clothing to keep yourself comfortable.
Dressing Appropriately For Skiing
Whenever we’re dealing with extreme weather like snowy conditions, we need to make sure to dress warm. However, when you’re literally blowing down a mountainside, you must take this up a notch. Cold wind nipping at your skin combined with snow being thrown back up at you is freezing, needless to say. Let’s take a look at how to keep warm, dry, and comfortable from the moment you get up to the resort till you are back in your vehicle heading home.
Layering
Layering is crucial to keeping comfy while skiing or snowboarding. If you get too hot, you can simply remove a layer. If you get a bit chilly, wear an additional one – it’s simple. However, you must know how to layer. The bottom layer is going to be thin and usually form-fitting yet stretchy enough to move freely with the body. The next layer could be thicker and a bit more insulating, while the outer layer should be waterproof and wind resistant.
Ski Jackets
A ski jacket is a necessity, as it works to provide excellent insulation while protecting against moisture and keeping the wind out. Not only that, but it needs to be breathable enough that you aren’t sweating or getting too hot in the jacket. There has to be a very fine-tuned balance in a high-quality ski jacket. In addition, they should have pockets for you to safely keep your lift pass, snacks, IDs, cash, etc.
Make sure you get the right jacket for you. Women’s ski jackets and kid’s ski jackets are available to suit their specific body type and dimensions to ensure the best results possible.
Ski/Snowboard Pants
How often have you seen someone up on the runs wearing jeans or leggings? We hope never, but the truth is there are still some people out there who don’t wear ski pants! The muscles in our legs are the largest muscle groups in our body, meaning we lose quite a lot of heat through them. Moreover, we need the muscles in our lower body to remain warm and limber so as to minimize the risk of injury and keep us performing our best!
Ski pants allow us to do this with ease. They are breathable, waterproof, wind resistant, and hold our body heat in to keep us warm and dry. Oftentimes, you can buy a matching ski jacket and ski pants, with some even allowing you to connect the two articles of clothing for a cohesive outfit that keeps out snow and wind without issue.
Gloves
You simply can’t go up skiing or snowboarding without a good pair of gloves. We lose body heat incredibly fast through our extremities, and we all know how painful it is to even lightly hit your fingers when they’re cold!
Skiing and snowboarding are both extreme sports, and even at an intermediate level you’ll probably do a good amount of falling. No one wants to accidentally hit their fingers on the edge of their board or on some ice!
These gloves allow for dexterity and a solid grip while keeping your hands and wrists warm and dry.

2. Ski Backpack
We recommend using a backpack if you’re going to be heading out into the backcountry. While you’re still on the bunny hills, you won’t be too far away from a lift or the lodge most times, so if you need a snack or something you have it all right there. However, when you start heading out into more remote locations, there’s also a greater need to carry along extra gear.
Not only should you bring along snacks, but devices like an avalanche beacon to keep you as safe as possible if an avalanche does occur. We hope that’s never the case, but you should know that this is a risk you take by skiing or snowboarding in the backcountry.
Backpacks make it easy to bring along another layer, a pair of thinner gloves, an extra pair of socks, etc.
3. Helmets
We can’t stress enough how important it is to wear a helmet. No matter what level of skier or snowboarder you are, head protection never goes out of style or becomes obsolete.
It can be relatively easy to crash, especially if you’re riding around trees or on ice hidden under the snow. There are so many unforeseen situations when we are riding on snow, particularly on unmanned trails and runs.
A crash that could end up in a serious head injury can be laughed off many times when wearing a helmet. It’s simply not worth it. Not only that, but helmets come lined with a very warm material that work to keep your head and ears warm.
4. Goggles
Last but not least, are ski and snowboard goggles. While you may see various skiers and boarders zooming around with sunglasses on their faces, it’s not ideal. If you crash, sunglasses can easily break and the lenses can even shatter, which is putting your eyes in unnecessary danger. Additionally, sunglasses won’t provide the full protection around your face and eyes that googles will.
Goggles come with a foam padding around the perimeter to ensure a tight seal to keep out snow, wind, and any debris, keeping your view clear. If you can’t see properly, you can only imagine the kind of danger you’re putting yourself in. Not to mention, sunglasses fog up very easily, which can also obstruct vision. A good pair of ski/snowboard goggles do not.
Preventing Injuries While Skiing
Learn Ski Etiquette
Oftentimes, you’ll find these general “rules” or guidelines on the back of your lift ticket or somewhere on a sign in the lodge or in the rentals area. These are all kind of common sense once you have been skiing a couple of times but you may not think of these things your first time up. These are not just polite, but can actually avoid you or someone else getting injured.
For example, you’ll need to ski in a controlled way so that you can effectively stop or ski around others who are in the way. Of course, like with driving, you should also give those downhill the right of way. You don’t want to cut anyone off as this can make them crash and is just rude.
When you’re merging onto a run, make sure you always look up and never stop to rest right in a curve or in the middle of a run. People understand that there are and will always be beginners who are prone to crashing. That’s okay! You shouldn’t be nervous about that, but make sure that you’re staying on the bunny hill until you are able to accomplish all of these etiquette rules.
Know How To Use The Lifts
This is actually a surprisingly easy way to get injured, but it’s also pretty easy to stay safe with just a little bit of awareness and experience. You may be thinking, “How hard can it be sitting on your butt all the way to the top of the run and hopping off?”. The answer is: “Harder than it looks.”
Not every ski lift is the same. Some are a bit more jerky and inconsistent, while newer lifts are known to be smoother and easier to use. I remember my first time on a ski lift. I thought it looked super easy, but when I was standing there waiting for my chair to come, I was rudely awakened by the chair coming up fast and knocking me off of my feet into the seat! Luckily it was into the seat and not on my face, but my point is that you need to be prepared.
This is where it’s helpful to take lessons as your instructor can go with you on the lift and give you some tips.
Tips To Make Your Ski Trip A Good One
Tip #1
The most important tip -don’t let your boyfriend (or anyone close to you, for that matter) teach you to ski. When you embark on this new adventure you will find skiing is not an inexpensive sport; however don’t let this tempt you to skimp on getting proper lessons. If you choose to take the cheap route, not only might you get injured. You may return home boyfriend-less.
Tip #2
You need to face the fact you will not be able to ski after one introductory lesson. I highly recommend you commit to at least three days. Believe me. There’s more to skiing than remaining upright. Controlling your speed and learning to stop are two essentials before striking out on your own.
Tip #3
Wear a ski helmet. Don’t just wear a helmet. Buy one. Renting one will cost just as much as purchasing your own. Plus you’ll avoid getting the cooties from previous users.
Tip #4
Don’t overpack. There’s no reason to bring two pairs of fashion boots to walk around a small town in the evenings. In fact, you will put yourself at risk of landing on your back when your boots inevitably lose traction on slick, icy sidewalks.
Tip #5
Don’t assume just because the weather is frigid outside that you won’t need comfortable short-sleeve attire. Being from Florida, I feared the kind of cold that seeps into your bones and keeps you from ever feeling comfortable.
I found the opposite. I made the mistake of packing only sweaters and sweatshirts, so actually felt too warm much of the time. Most establishments are kept quite warm. There is little chance you will actually feel uncomfortably cold.
Tip #6
If your hands are prone to getting cold it is best to use ski mittens rather than gloves. There are disposable hand warmers you can buy on the Internet but I found them unnecessary.
Tip #7
Sunscreen is not optional. Just because it’s cold, and even if it’s overcast, does not mean you won’t be susceptible to sunburn. In fact, the white snow reflects the sun’s rays, making it potentially more damaging to your skin than sunshine in my own state. It’s also wise to bring along a combo lip balm sunscreen.
Tip #8
Possibly the most important in my opinion, a neck pouch is an invaluable accessory. While your ski jacket and pants will have more than enough pockets, using a neck pouch conveniently keeps your personal articles in one place- lip balm, cash, hotel key etc.
Finally, as a first time snow skier you may find that lugging around all of the equipment and clothing is a cumbersome task. Remembering the gloves, helmet, pants, goggles, and a myriad of other things can seem overwhelming at first. But after a couple days, it will become second nature and it won’t take you quite so long to prepare for an exciting day on the slopes.
Happy and safe skiing!